Device Authentication
You must explicitly authorize any Device identified by a set of Identity attributes before it can authenticate with the Mender Server.
This section describes the components and workflows relevant to Device authentication, and provides practical tips on navigating our APIs to successfully authorize Devices, monitor authorization status, and troubleshoot related issues.
Authentication service
The Device Authentication service, a part of the Mender Server, implements Device authentication.
This service exposes APIs for:
- Device authorization, namely granting access to specific Devices
- issuing and keeping track of authentication tokens (JSON Web Token)
- inspecting and managing Devices and their authentication credentials
Identification and authentication
Mender identifies a Device by a set of Identity attributes (MAC addresses, user-defined UIDs, etc.); think of it as an extension of a unique identifier into a multi-attribute structure (see Identity).
To obtain an auth token, the Device sends an authentication request containing the Identity attributes and its current public key. The client signs the request with the private key (kept secret on the Device), and the server uses the public key to verify the signature. The combination of Identity attributes and public key forms an authentication set, or 'auth set' in short.
The concept takes into consideration Device key rotation - a single Device may over time present different keys, and it's important to track those, and allow the user to accept (i.e. authorize) or reject a particular identity/key combination. Mender keeps tracks both of a Device as a single real-world entity, where each Device might create multiple Authentication sets. Note that maximum one Authentication set can be accepted for a specific Device at any given time.
Authorization Flows
Mender provides three possible authorization flows. Two of them involve a user's explicit consent to authorize a Device via the UI or Device Authentication API, but they differ in the order of events and intended use cases. The third one, available as an Enterprise feature, leverages a PKI (Public Key Infrastructure) to authorize devices based on client certificates without the need of explicit user's actions. Below is a detailed breakdown of each.
For details of API calls please consult the API documentation.
Authorize-on-request Flow
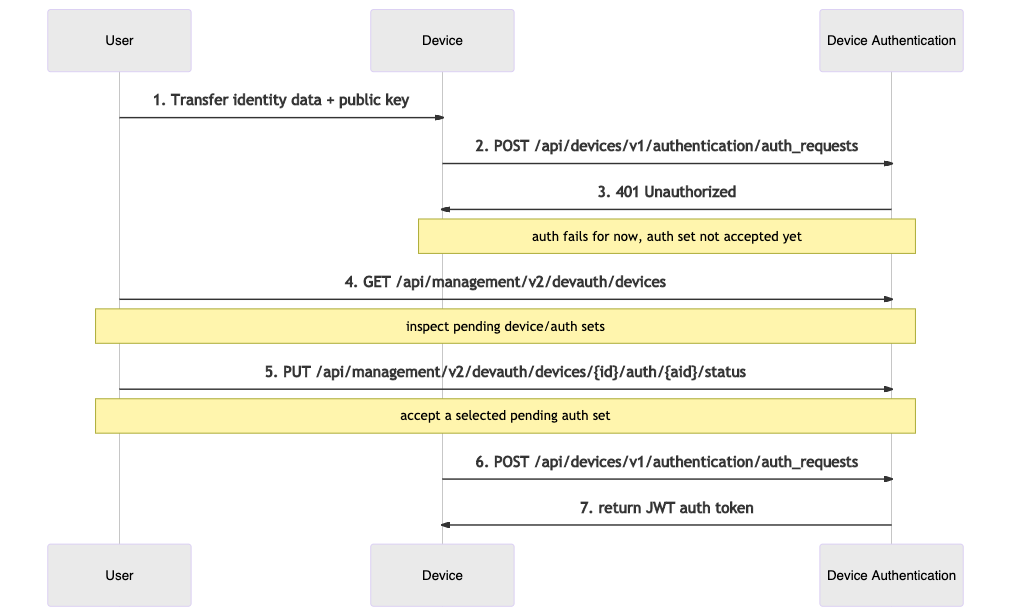
The simplest flow, which usually suits quick prototyping and testing best, is manual authorization. The Mender Server records every auth request for future inspection. You can accept it via the Device Authentication API (or the UI) whenever you see fit. When the Device sends another auth request it will result in a successful authorization.
The authorize-on-request flow therefore requires the user to accept Authentication sets one-by-one, as Devices connect to the server. As such it is not ideal for scenarios with many Devices; we recommended it for smaller or non-production installations instead.
The sequence diagram below describes the API interactions between the user, Device, and Device Authentication within this flow:
- The user provides the Device with some Identity attributes and a public key.
- The Device tries to authenticate, retries in a loop according to the Mender client's configured interval.
- For the time being, authentication attempt fails, but the Mender Server records the auth set for future inspection.
- The user inspects pending Authentication sets.
- The user accepts the submitted auth set.
- The Device applies for an auth token again.
- Device Authentication returns a valid authentication token.
 |
|---|
| Authorize-on-request flow |
Preauthorization Flow
Preauthorization is the idea of authorizing a Device before it connects to the server for the first time. This is an intuitive model analogous to creating an account before logging in to an online service.
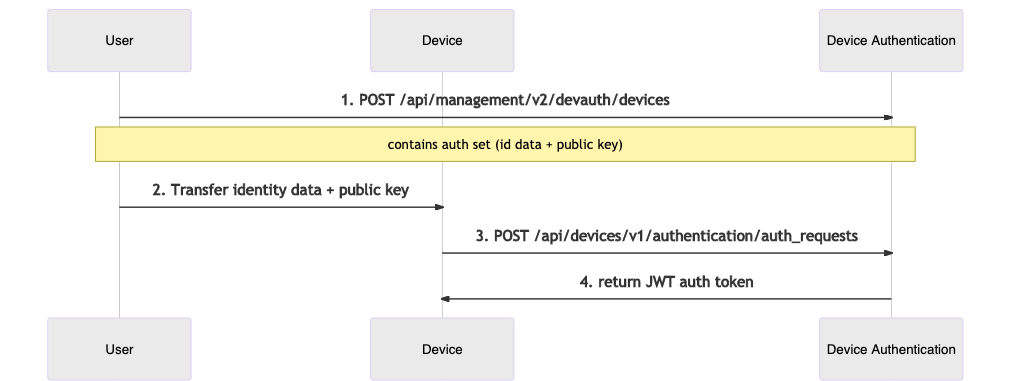
It allows you to authorize a particular Device before it leaves the production line by providing a pre-assigned Authentication set to the Device Authentication. When a Device with the corresponding Identity attributes and public key requests authorization, the Mender Server will authorize it immediately without further user intervention.
This flow is typically better suited for a production use case, where you plan a release of a potentially large batch of Devices:
- You assign and track Device Identity attributes/keys outside of Mender.
- Manually or via script, the user preauthorizes the Devices using the Device Authentication API.
- During the release process, you transfer identities and keys to physical Devices.
- Upon the first authentication request for each Device, the Mender Server authenticates it, and the Device gains access to all Mender APIs.
The sequence diagram below describes the API interactions between the user and the Device Authentication within this flow:
- The user first submits a preauthorized auth set to the Device Authentication.
- The user makes sure the physical Device contains the corresponding Identity attributes and public key.
- When the Device activates, the client submits an authentication request containing the Identity attributes and key.
- The Device Authentication service returns a valid authentication token.
 |
|---|
| Preauthorization flow |
Client certificate authentication and Mutual TLS
Mutual TLS was previously supported by the mtls-ambassador server component - which has been replaced by mender-gateway.
Please see the migration guide for steps on how to migrate from mtls-ambassador to mender-gateway.
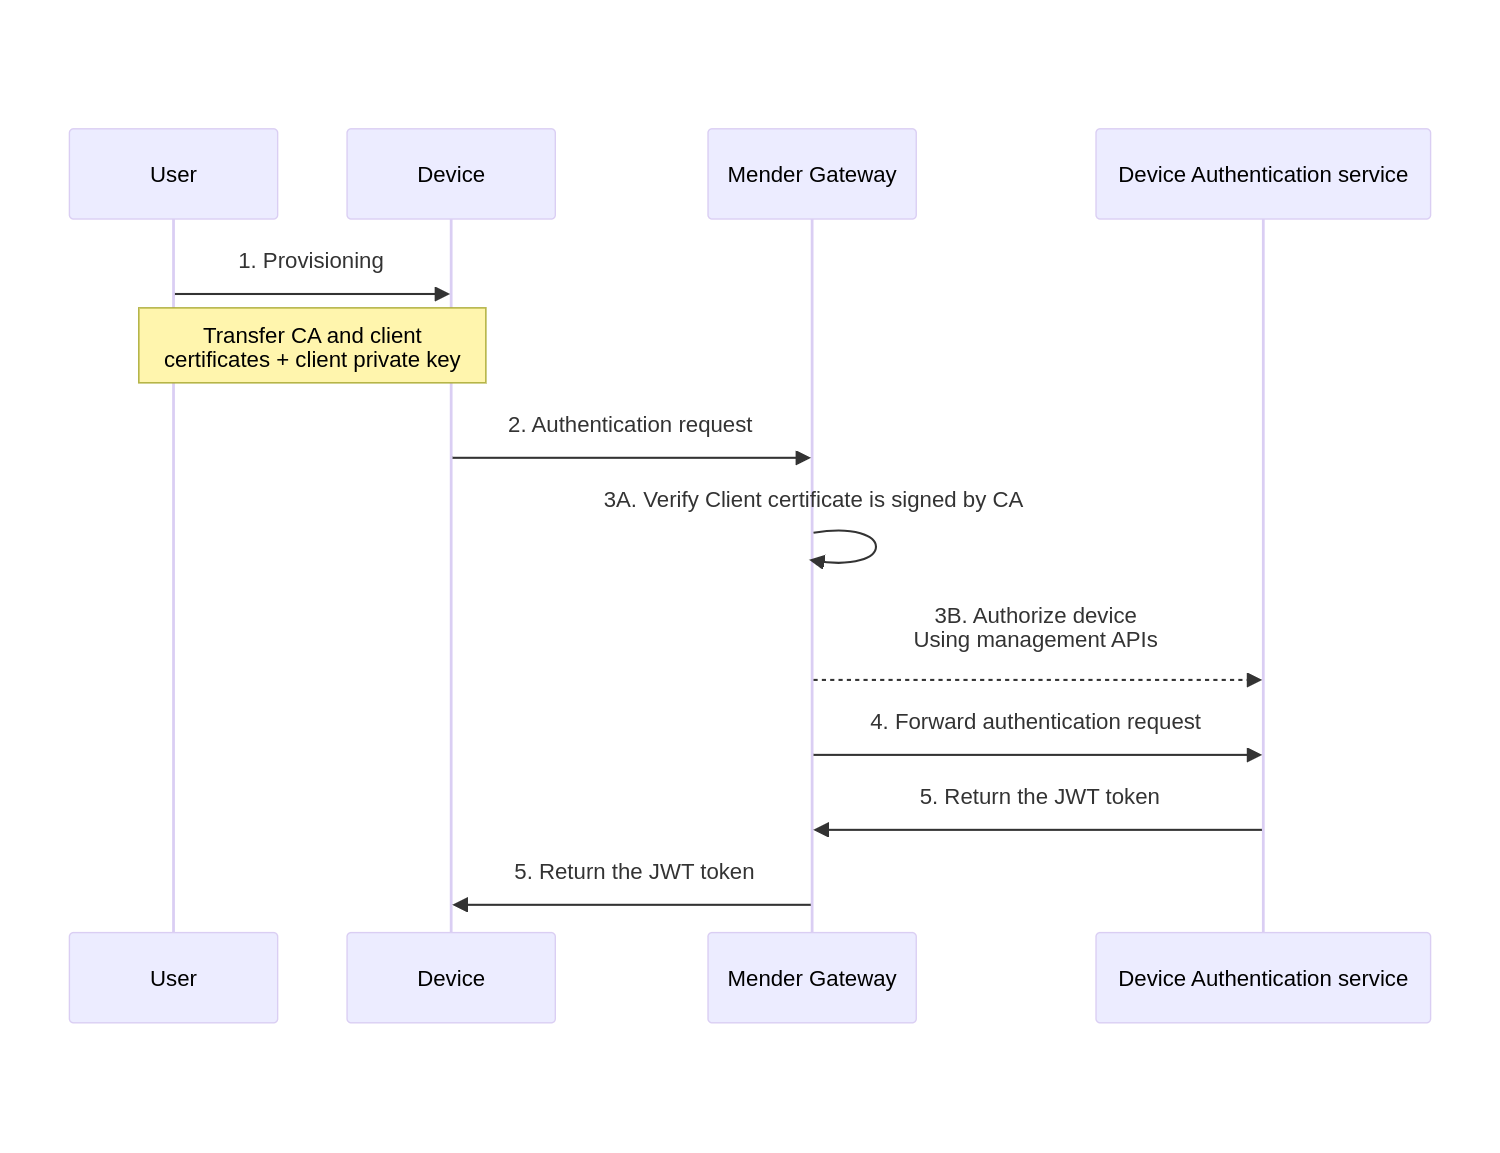
Mender Enterprise supports setting up a reverse proxy at the edge of the network, which can authenticate using client TLS certificates. Each client is equipped with a public certificate signed by a Certificate Authority (CA) along with the private key. The edge proxy authenticates devices by verifying this signature. Authenticated devices are automatically authorized in the Mender backend, and do not need manual approval.
This is in particular useful in a mass production setting because you can sign client certificates when they are manufactured so they automatically get accepted into the Mender Server when your customer turns them on, which might happen several months after manufacturing.
The sequence diagram below describes the authentication of a Device using mender-gateway:
- The user first provisions the device with the crypto material: public CA certificate, client certificate and client private key.
- The device sends the authorization request to the
mender-gatewayauthenticating the request with the client TLS certificate. - The ambassador verifies the device's certificate is signed by the CA certificate, and pre-authorizes the device to the Device Authentication service.
- At this point, the authentication request is forwarded to the Device Authentication service.
- The Device Authentication service returns a valid authentication token, which the mTLS ambassador forwards to the Device.
 |
|---|
| Client certificate authentication flow |
Futher communication between the Device and the Mender Server is intermediated by the mender-gateway which verifies the requests are authenticated with a valid client TLS certificate.
Please refer to the Mutual TLS section to find further details on the configuration of this feature.
Authentication Token
After the Mender Server authorizes a Device, a subsequent authentication request to the Device
Authentication service returns an authentication token. The mender-auth component will record the
token and make it available over a DBus API. The mender-update component will use this
API to fetch the token and attach it to every API call under the HTTP Authorization header.
The token does have an expiry date (one week period by default), but mender-auth
will obtain a fresh token from the Mender Server automatically.
For details on the token format please see the relevant documentation on submitting an authentication request.
Authorize to external systems
Mender makes it possible to integrate devices with Azure IoT Hub.